

Step 1: Make a pattern
To decide the mold’s form, you must first develop a pattern. 3-D models of your finished castings may be used as a pattern for casting. The 3D models also available at dawangcasting.com. Wax, sand, plastic, or even wood can be used to form it. Casters may employ plaster or silicone moulds, which are materials that cannot survive molten metal, but allow the caster to mass produce wax multiples for use in disposable mould casting. Make sure your account for any shrinkage that may occur while the metal cools. Spruces can also be used to enable the molten metal to flow into the mould when patterns are gated with them.
Step 2: Mold making
It’s time to make a mould once you’ve made a pattern. There are two types of moulds you may make: a reusable mould (usually made of metal) and a single-use mould (often made of sand). Depending on the kind of casting metal and the amount of complexity of the design, each of these processes is best suited for producing moulds. Using a kiln, you may burn away a wax or plastic design that you’ve used for your project.
Step 3: Choosing Metal Alloy
Alloys, whether ferrous or nonferrous, are used to make all metal castings. Mechanical qualities of alloys are derived from a combination of components that best suit their intended function. Steel, malleable iron, and grey iron are examples of ferrous alloys. Aluminum, bronze, and copper are the most popular non-ferrous alloys used in casting. Silver, copper, gold, and platinum are all valuable metals that may be used in a jewellery workshop.
Step 4: Melt the alloy in the furnace
Each alloy has a variable melting point, hence the melting procedure will be different for each of the alloys. Simply, melting an alloy involves putting the solid material into an open flame or furnace-like crucible and heating it.
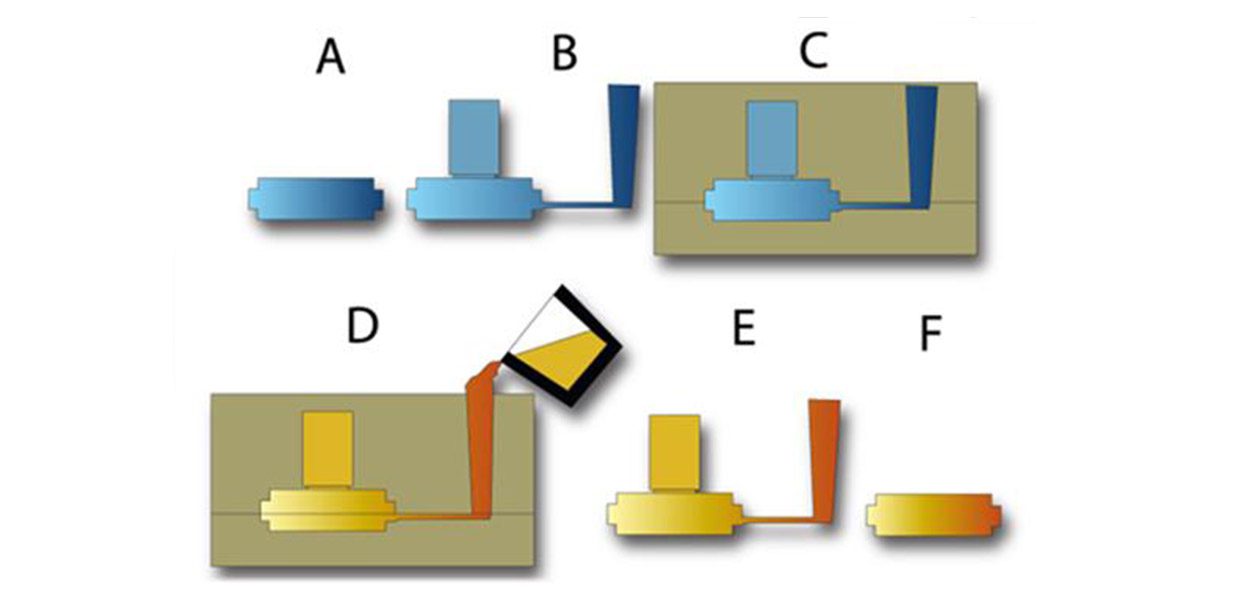
Step 5: Pour the mixture into the mould
Pour the molten metal into the cavity of the mould. Small castings can be made by simply pouring hot metal directly into a mould from the crucible where it was cooked in the first place. A small crew may be required to assist with the heating of the metal inside of a furnace and the transfer of the metal into a bigger crucible or ladle before the metal is poured into the mould for a larger casting.
When pouring molten metal, make sure to follow all safety precautions that have been prescribed. Wear protective clothes, such as natural fiber apparel, long pants and sleeves, insulated gloves, and safety eyewear, when working in hazardous conditions. Work in a well-ventilated area to prevent being exposed to potentially hazardous gases. Make sure you have a chemical fire extinguisher handy, and make sure the passageway between the furnace and the mould is free of obstructions. Allow for solidification of the mould before proceeding to the next stage.
Step 6: Carefully lift the casting out of the mould
It is possible to remove the metal from the mould when it has cooled and set. If you cast into a single-use mould, you will be able to separate the mould from the casting when it has been completed. Depending on whether you used a plaster investment, you may wish to quench the plaster in water once it has hardened. Mold will be more easily removed with the aid of water. If you are using a reusable mould, you may extract your casting by using ejector pins.
Step 7: Finishing
Prepare your solid metal cast by filing and polishing it! When cleaning your cast metal item, use water to remove any leftover mould material, clippers to break off the casting gates for small things or an angle grinder for large pieces to remove the casting gates from the casting gates. For any other guide line, click at read more here.