

Some time ago, we saw together how to photograph the PC screen in order to make screenshots to share on the web, show to friends or bring for the attention of co-workers. This practice, however, is not reserved only for the world of computers: it is also available on smartphones, where it can be used to show the functioning of an app, share one’s home screen in public or to report errors / malfunctions to the assistance services. technique.
So here I am, ready to offer you a new tutorial and to explain how to photograph the iPhone screen , which is one of the most popular smartphones in the world and – like all the latest generation phones – includes a practical function to “immortalize” everything that happens. on the screen. If you need to take a screenshot on your “iPhone by”, then take five minutes of free time and read the instructions below: in no time you will learn how to take “pictures” to the iOS home screen, to the apps you have installed and any other content that “passes” through your phone screen and for you take screenshot iphone 14 pro max .
The procedure is extremely intuitive and is common to all iPhone models and all iOS versions, you will be amazed by its disarming simplicity! How do you say? Do you already know how to take screenshots on iPhone but you can no longer do it because the button to take them is broken? Do you need to “photograph” a whole Web page and you don’t know how to do it? Do not worry, during the guide I will also deal with these aspects. Find everything explained below.
Index
- Take screenshots on an iPhone
- Take screenshots on an iPhone without using the physical keys
- Photographing web pages on iPhone
- Merge screenshots on iPhone
Take screenshots on an iPhone

While browsing the internet you have come across some really interesting photos, however can’t find any way to download them? Have you read one of my tutorials carefully and would like to keep the explanation or the crucial passage, so that you can follow it when needed? Don’t say anything else, you definitely need to know how to take screenshots on an iPhone .
You may not know it but also on iPhone , as well as on PC and Android , it is possible to take snapshots of the screen, useful for immortalizing something important, which you want to share or simply to use as a reminder. The procedure to follow is very simple and consists of simultaneously pressing two keys. However, there are differences depending on the type of iPhone available to you.
If you have an iPhone with Face ID , i.e. the unlocking system via face recognition, all you have to do to take a screenshot is to simultaneously press the power key , located on the right side of the phone, and the volume up key , instead present on the left side. If, therefore, you are wondering for example how to photograph the iPhone 11 screen or how to photograph the iPhone 13 screen (both models with Face ID), what you will have to do is just that!
If, on the other hand, you have an iPhone with a Home button , i.e. models prior to iPhone X and iPhone SE (all characterized by the iconic central button), the combination of buttons to press is different: you must simultaneously press the Home button ( the one located in the center, under the smartphone screen) and the power button , located at the top right in iPhone models equal to or less than 5s and on the right side of the phone in iPhone models equal to or greater than 6.
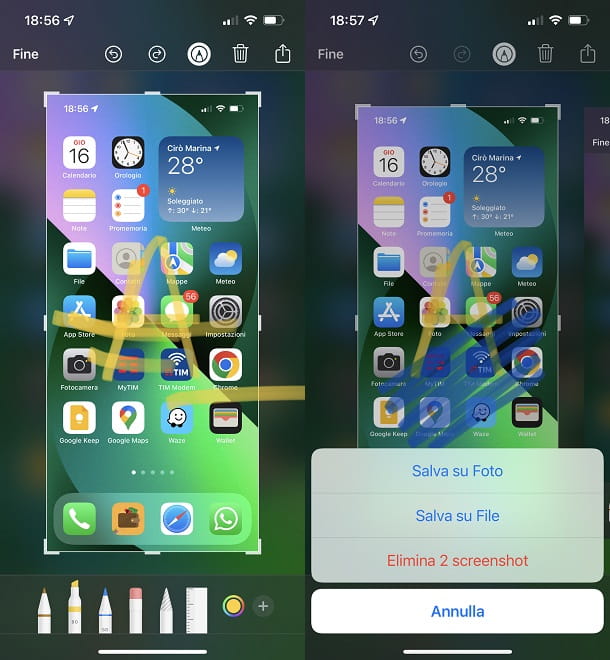
Once you have taken the screenshot, regardless of the iPhone model in your possession (if you have updated iOS to a recent version) you will notice a box showing the screen just photographed at the bottom left : with a tap on it you can proceed to make some changes , how to resize the photo or write on it using the pencils and markers available. In particular, the latter option is very useful for highlighting parts of the screen and focusing attention on them, perhaps before sending it to some contact via WhatsApp .
In fact, there are several options for editing screenshots : starting from the lower left corner you can find a medium-tipped marker , a highlighter and a pencil , useful for drawing above the snapshot. Next to these first tools you will then find an eraser , useful for erasing what is written and a pointer , to select the individual strokes and elements on the screen. Finally, you will find a color palette , with which to select the desired color, and the + icon , with which to add different text options ( description , textand signature ), adjust the opacity of the image, zoom with a lens or add geometric shapes .
At the top there are instead the arrows to cancel operation and repeat operation , the icon of a pencil contained in a circle that enables the possibility of writing on the snapshot with the tools seen above (by disabling this option with a tap you can instead resize the image or, by pressing the icon of a square with lines you can directly copy the text contained within the screen) and the Share command to send the screenshot via the main messaging apps. Obviously the End key, present in the upper left corner, is used to confirm the changes made and save the screenshot as a photo in Camera Roll ( Save to Photo ) or as a file in a folder on the device or in iCloud Drive ( Save to File ), or you can also decide to delete the screenshot .
Take screenshots on an iPhone without using the physical keys

Is one of the keys to use to take screenshots on your iPhone broken? Do you find this procedure difficult to perform or do you often forget which keys to press at the same time? Don’t worry, even in this case there is a way out. In the next few lines I will explain how to take screenshots on iPhone without using the physical keys .
The first method I want to recommend is also the fastest and most intuitive. In fact, you can take advantage of the voice commands of your smartphone to photograph the screen. That’s right, I’m really talking about Siri . So you just have to contact the voice assistant of your Apple device, calling it up with the classic “Hey Siri” , and complete the request by speaking the command “take a screenshot” . Within a few seconds you will find, always at the bottom left, the thumbnail of the snapshot just taken, which can be edited.
Are you in an enclosed place where you cannot speak loudly? You can then use the handy AssistiveTouch tool which can replicate the functions of the Home button with a virtual button on the screen. Specifically, you will have to go to the iOS Settings section (by pressing the gear icon located on the main screen), follow the General> Accessibility> AssistiveTouch path and activate the lever relating to the AssistiveTouch function (I have already talked about it in depth in my dedicated tutorial ).
After completing this preliminary operation, which you will have to perform only once, tap the virtual Home button that appears on the iPhone screen, press Device> Other from the menu that opens and tap the Screenshot button to take the snapshot . Also in this case, what was said above about the possibilities of editing the screenshot applies. You can instantly deactivate and activate the AssistiveTouch control by quickly pressing the side power button three times .
Would you like to have an even faster alternative? You only need to ask! In fact, you can take advantage of an interesting iPhone feature introduced starting from iOS 14 , I’m talking about the Rear Touch which allows, through the simple contact of the finger with the Apple logo on the back of the phone, to perform various commands including the screen capture. To activate this feature, go to Settings> Accessibility> Touch and scroll down the screen until you find and tap the Rear Touch item .
If you prefer that the snapshot is made by double-tapping the apple logo, tap the Double- tap item and select the Screenshot function from the list that you will see . If you prefer, you can also assign this command to the Triple tap item and more screenshot iphone tips here.
Photographing web pages on iPhone
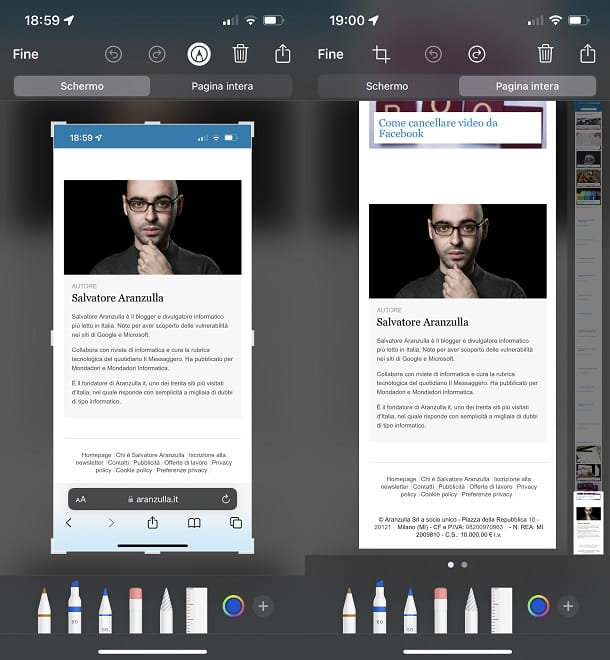
Perhaps not everyone knows this, but it is also possible to photograph the web pages on the iPhone in full (thus performing a complete scrolling of the same) without resorting to third-party apps. Just use any browser, such as Safari . Go, therefore, to the page you want to make the screenshot and perform the screen capture normally, as I explained to you before .
Also in this case you will notice the thumbnail of the snapshot just taken at the bottom left. Tapping on it will open the menu related to the changes of the screenshot . You will notice in this case that, in the upper section, there are two buttons. The first, Screen , corresponds to the classic screenshot, while it is by pressing on the second, Full page , that you will be able to succeed in your goal. Once again you will find the different brushes and pencils useful for customizing the image and, at the same time, the possibility to save the image as a photo or as a PDF file .
Merge screenshots on iPhone

Have you made several screenshots and would you therefore like to merge them within the same photo? If you intend to merge snapshots from the same screen, such as a messaging app , just take screenshots of the various screens of your interest normally and then use an app to merge them vertically.
Among the most famous apps suitable for this purpose, I point out Tailor : an application that automatically recognizes the screenshots present in the iOS Photos and combines those that match each other. In this regard, it is very important that the screenshots to be merged are consecutive, otherwise they are not recognized.
The app is free but a watermark (i.e. a logo) is affixed to the images you merge. To remove this limit, the paid version must be unlocked by making a minimum donation of 2.99 euros. To merge the iPhone screenshots you will only have to start the app, giving permission to access the iOS photos. You will notice that the screenshots to be merged will be automatically recognized by the app. When the operation is complete, press the Share button and choose whether to save the image in the iOS roll or whether to share it.
For workarounds suitable for this purpose, I invite you to try the Combine Images & Share shortcut and read my tutorial on photo merging apps .