

In recent weeks you bought an iPhone X and you immediately proceeded to organize and order the home screen of the new device in the best possible way so as to be able to find the apps you use most as soon as possible. Well happy and satisfied with the final result, you have therefore tried to take a screenshot of what is shown on the display but since the Home button is not present, which on all other “iPhone by” models must be pressed in combination with the Power button to perform this operation. you have succeeded in your intent and here How to screenshot iPhone 14 pro max.
However, being a guy who does not give up easily, you immediately rushed to the Web in search of some nice tutorial that would explain how to proceed and you are therefore fake here, on this article of mine. How do you say? Things went exactly like this and would you like to understand if I can actually help you or not? Of course yes, it was obvious! If you give me a few minutes of your precious free time, I can show you, in detail, how to take screenshots for iPhone X.
So? What would you say to finally put the chatter aside and get to the heart of the matter? Yup? Great. Make yourself comfortable, grab your iPhone X and carefully read all the instructions about it that you find below. I anticipate immediately that, contrary to appearances and beyond what you may think, in reality it is a real child’s play. Enjoy the reading!
Basic procedure

As anticipated at the beginning, taking a screenshot on iPhone X is, contrary to what it may seem, a fairly simple and fast operation. However, the key combination to use is different from the one used on all other iPhone models ( Home Button + Power Button ). The removal of the Home button on the iPhone X has in fact implied, for Apple, having to review several of the commands associated with the operation of the borderless iPhone, including the one to “photograph” the screen.
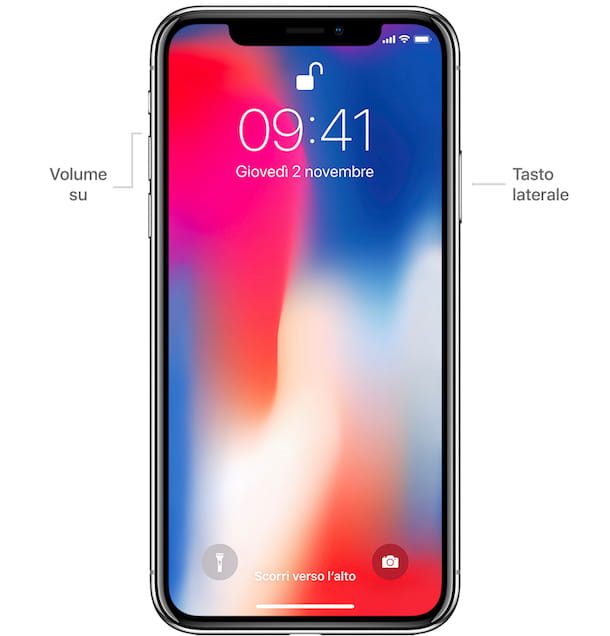
So? How you do it? I’ll tell you right away: just press the side button (the one on the right) at the same time as the button to increase the volume (the first starting from the top on the left side). That’s all!
The correct execution of the command will be signaled by the reproduction of a sound that simulates the photographic shot as well as by the fact that the screen will be quickly illuminated by a flash.
You can take screenshots on your iPhone X not only on the home screen of the device but also in all applications, games and lock screen. In short, whatever you are viewing on the display, the command will always work and screenshot on iPhone.
All captured screenshots are saved in the camera roll of the iOS Photos app, the same one that is used for “common” photographs. If you want to view only the screenshots captured excluding the rest of the images on the device, once you have accessed the Photos app, select the Albums tab at the bottom and then stop on the Snapshots album , all of them will be collected.
Alternative procedure
Has the side button or volume up button on your iPhone X broken or isn’t working as it should? Are you looking for an alternative method to the one above to take screenshots on the most recent smartphone of the “bitten apple”? Then take advantage of the AssistiveTouch function , which allows you to access specific commands and functions of the iPhone in an assisted way, directly and exclusively at your screen and which can be useful if it is not possible to use the classic commands of the device. In the specific case of screenshots, you can use them to make them through a practical virtual button.
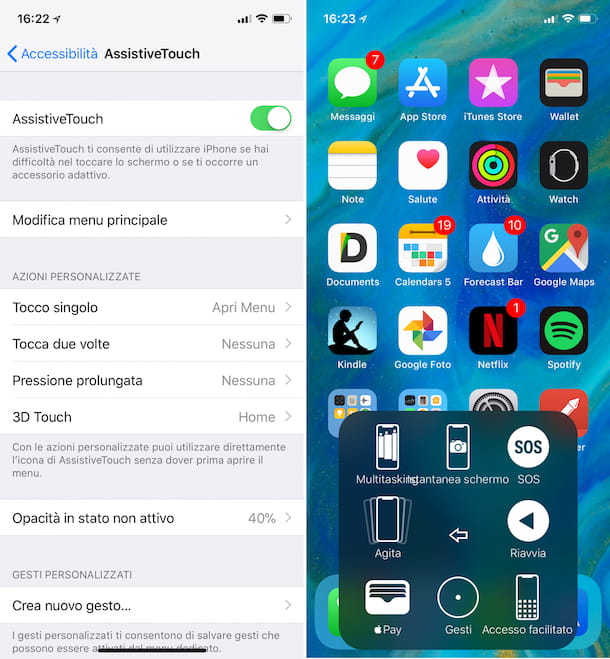
First of all, therefore, enable the use of AssistiveTouch on your device. To do this, grab the iPhone X, unlock it, access the home screen and tap the Settings icon (the one with the gear ). In the screen that will subsequently be shown to you, presses on General , then on Accessibility and then on AssistiveTouch . Then turn ON the switch that you find next to the word AssistveTouch and on the bottom of the screen you will immediately see a dark white circle appear in the center . It’s AssistiveTouch’s virtual button!
Now press on the aforementioned button, step on the Device item in the menu you see appear, select Other and tap the Snapshot button to capture the screenshot. Done!
Edit screenshots

Have you noticed that every time you take a screenshot with your iPhone X following one of the two procedures above in the bottom left corner of the screen, the screenshots are shown in thumbnails ? Yup? Well, know that by pressing on them you can immediately view them in an enlarged way and access the appropriate editing tool.
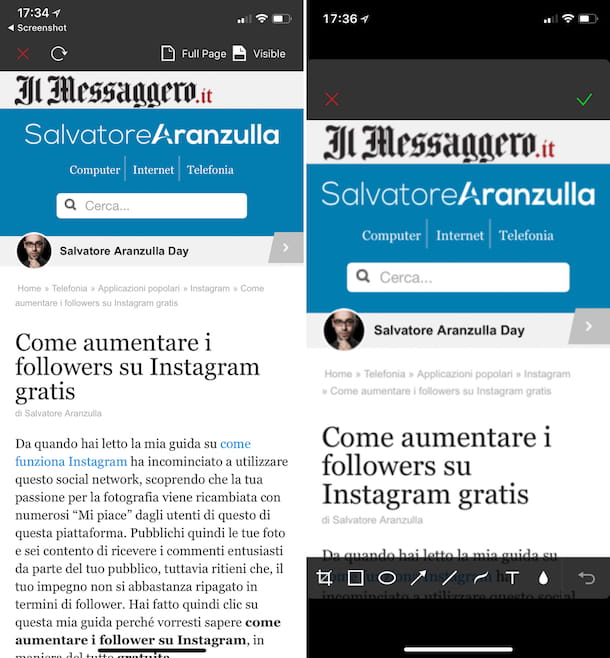
Using the editing tool you can for example add text, freehand drawings and other elements to your screens and save the images with the following changes in the device roll. More precisely, you can use the pen tool and the pencil tool , a highlighter , an eraser and a selection tool as well as a color picker . All changes made to screenshots can be undone and redone using the arrow keys at the top right.
If, on the other hand, you want to add a text , a signature or a magnifying glass to enlarge a certain part of the screenshots, stop on the [+] button at the bottom right and select the desired option. If, on the other hand, you want to zoom the entire screen captured, you can use the “usual” pinch to zoom. You can also add additional elements such as squares , circles , speech bubbles and arrows .
Have you captured more than one screenshot and would like to be able to edit them all at once? You can do this too! To do this, scroll through the various screens that are shown to you in the editor by tapping from time to time on the relative preview that you see at the right and / or left end.
When the changes are completed, save everything by pressing on the word End at the top left and then click on Save to Photo . By doing so, the edited screenshot will be saved in the iOS camera roll, replacing the original one. If then you had thought about it and wanted to delete the captured screenshots, you can do everything directly from the editor by pressing first on End and then on Delete screen snapshot .
If, on the other hand, you want to share the screenshots edited in another app, press the sharing symbol (the rectangle with the arrow ) at the bottom left of the editor and select the desired destination from those available in the menu you see appear.
Both in the case of saving (or deleting) and sharing, if you do not want to intervene on all the screens but only on some of them, always remember to deselect those that do not interest you by pressing the relative check mark in the upper corner To the right.
Take screenshots of web pages
Using the “standard” functions I talked about in the previous paragraphs you can take screenshots on Phone X of anything you see on the screen but unfortunately for what concerns the Web pages you must necessarily rely on third-party tools. Or rather, you have to do it if you want to take a screenshot of a given web page in its entirety (which in the vast majority of cases does not correspond only to the portion currently displayed on the screen).
So if you have this type of need, I suggest you rely on the use of Awesome Screenshot for Safari . This is a free resource that, in fact, can allow you to capture Internet pages for their entire length in the form of images. It also includes an editor with tools that allow you to modify the screenshots of the captured Web pages by adding additional elements such as arrows and annotations. Oh, I almost forgot, the application is also very easy to use!
To try Awesome Screenshot for Safari, the first thing you need to do is download the application from the App Store. So grab your iPhone X, unlock it, access the home screen of the device, press the App Store icon (it is blue with the letter “A” in the center ), stop on the Search tab at the bottom right, type awesome screenshot for safari in the appropriate field located at the top and presses the Search button on the virtual keyboard on the display.
Then select the app icon (the one with the camera lens on a multicolored background ) from the search results that are shown to you, step on the Get button and then on the Install button and then type the password of your Apple ID (or use Face ID) in order to start the download procedure. Eventually, you can speed up the execution of the steps in question by connecting directly to the App Store section dedicated to Awesome Screenshot for Safari by tapping here from your iPhone.
Then start the application by pressing the Open button on the App Store screen or by tapping on the application icon that has been added to the home screen, close the short introductory tutorial that is proposed to you by pressing the “x” at the top right, presses the Open Safari button on the Safari screen that will open, stop on the sharing symbol at the bottom, then on the Other icon in the first line and turn ON the switch next to the word Screenshot .
Then go to the Web page you want to immortalize, presses again on the sharing symbol at the bottom of the Safari screen and presses the word Screenshot always present in the first line of icons. Now, stop on the Full page icon located at the top right, select the size from the menu that appears, add (if you want) annotations, arrows and other elements to your snapshot or crop it or add a blur effect using the bar of the tools that is at the bottom and presses first on the green check mark and then on Save to save the image in the iOS roll and how to screenshot on iPhone.
When the app asks you for permission to access the photos, remember to answer affirmatively, otherwise the screenshots of the Web pages captured with your iPhone X will not be able to be saved in the Photos application , to be precise in the album titled Awesome Screenshot )
In addition to the way I just indicated, you can open the web pages you want to take a screenshot of directly from the app. To do this, type the reference url into the appropriate bar in the center of the Awesome Screenshot for Safari main screen and tap the Go button on the on-screen keyboard.
If you want, you can also use the app to edit “normal” screenshots already saved in the iOS roll. To do this, stop on the multicolor button that you find in the center of the main screen of the application and select the reference elements from the photo gallery.
Merge the screenshots
Have you captured two or more screenshots related to a discussion on the messaging app you usually use or have you saved some screens that you think should be linked together and would like to see them all in one image? Then you can use the Tailor – Screenshot Stitching app . In fact, this is an application that can automatically recognize the screenshots present in the iOS camera roll by combining those that match each other. It is free to download but applies a watermark to the images that can only be removed by purchasing the full version of the application through in-app purchases.
To use it, the first step you need to take is to download the application from the App Store. To do this, grab your iPhone X, unlock it, access the home screen of the device, press the App Store icon , step on the Search tab at the bottom right, type tailor in the appropriate field located at the top and step on the Search button that is on the virtual keyboard visible on the screen.
Then select the app icon (the one with the black background and the two joined pages ) from the search results that are shown to you, step on the Get button and then on the Install button, then type the password of your Apple ID (or use the Face ID) in order to start the download procedure. Eventually, you can speed up the execution of the steps in question by connecting directly to the App Store section dedicated to Tailor – Screenshot Stitching by tapping here from your iPhone.
When the download is complete, api the app by tapping on the Open button in the App Store or on its icon on the home screen, grant it permission to access the iOS photos by first pressing the Allow Access button at the bottom and then OK , wait for the ‘app searches for all available screenshots and selects the ones to merge.
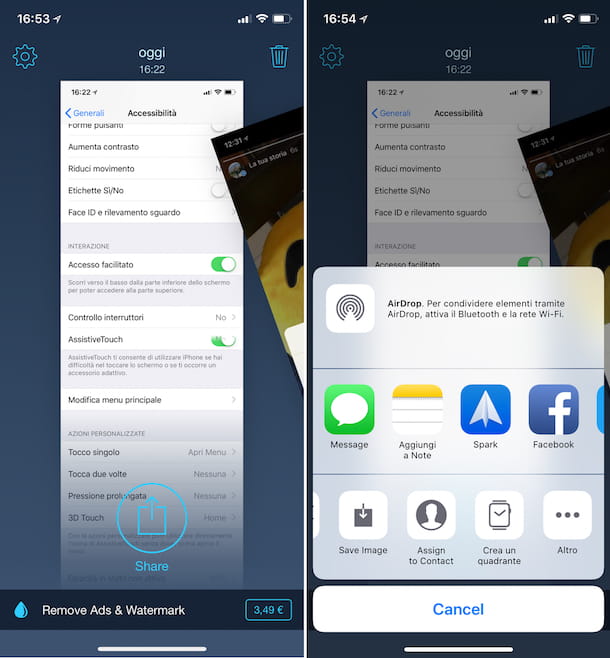
Finally, stop on the Share button and choose whether to save the image in the iOS roll by pressing the Save image button or whether to share it in another application by selecting the relevant option from the menu you see appear.